Using your AirPods on Windows is very easy. You may lose the Apple ecosystem features but its works knowing how to connect AirPods to Windows 11 in easy steps. Apple Airpods also work with your Windows Computer (Thanks to Apple for giving an option!). Suppose you want to use your AirPods with a Windows computer. In that case, you may not get an Apple ecosystem feature, but it works as a normal wireless earphone that does the job of listening to music, meetings, watching videos, etc. This article will see how to connect AirPods to Windows 11 computers/laptops.
Windows 11 is the latest release of Windows OS from Microsoft, giving many improvements to Bluetooth connectivity. To use your AirPods on Windows 11, you will need Bluetooth connectivity on your device. You may use a Bluetooth dongle to get wireless Bluetooth functionality using a desktop computer.
How to connect AirPods to Windows 11?
The process is very similar to connecting every other Bluetooth device.
- Put your AirPods into the case and close the case for 10 seconds.
- While keeping the case open, press the Setup button on the case. (Located at the back of the case)
- Keep it pressed until the LED light starts blinking.
- Now, open the Windows Settings (Win+I) on your computer.
- Go to the ‘Devices‘ option.

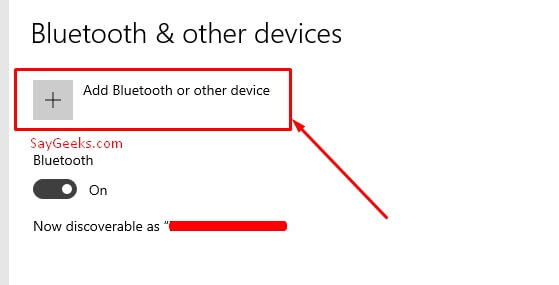
- Open the Bluetooth and other devices option from the left side menu.
- Now, click on the ‘Add Bluetooth‘ device option.

- From the popup menu, select the ‘Bluetooth‘ option.

- The system will now start searching for available Bluetooth devices.
- From the search list, you can see the ‘AirPods name‘. Click on the name to start pairing.

- Your AirPods are now connected to Windows 11. Click on the ‘Done‘ option to finish the setup.

You can now use the Airpods on Windows 11 as regular Bluetooth earphones. Once the AirPods are connected to Windows, you cannot use them seamlessly on your iPhone or another device; you need to disconnect them from windows and then connect to another device. Here’s how to disconnect them from windows.
How to disconnect AirPods from a Windows computer?
- Open Windows Settings (Win + I).
- Open the ‘Devices‘ option.
- From the Bluetooth options, under the ‘Audio‘ section, you can see the ‘Airpods name‘.
- Click on the name and click on the ‘Remove device‘ button.

Done! Your AirPods are now removed from Windows 11.
You can now again press a Setup button and pair the device on your iPhone.
How to rename your Airpods?
It’s a very easy task to do. Read this guide to know how to rename AirPods easily?.
Summary –
We discussed an easy way how to connect AirPods to Windows 11 in easy steps. Let us know if there is any doubt regarding the information provided in the article in the comment section below.


